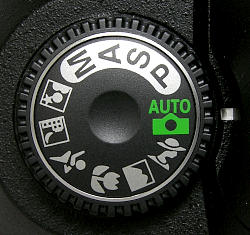
I’m back with my second installment of Tips and Tricks of Photography, brought to you by Life’s Fotos and Mumbling Mommy.Last time we talked about the Night Sky setting. Today I want to talk about how to use the portrait setting on a camera.
The “fancy hat lady” button allows you to blur backgrounds. Or attempts to (the best result always happens in manual but we’ll get to that soon enough).
The portrait setting uses the fastest available lens setting or aperture. It uses your focus brackets, and keeps that sharp, while attempting everything else outside of that area.
Here’s how to use the portrait setting on a camera in real life:
Portrait Setting On A Camera
Varying your focus. IE: Outside pick to subjects that are semi close together, but far enough apart that both of them will not be in your focus brackets at the same time. Then take turns placing each one in your focus brackets and check to see if the other subject is blurry. It may only be subtle (depending on how good your camera does, even my iPhone does it to a point). Remember not to use your flash.
It will take some time to get adjusted to how to use the portrait setting, and to know when you even want to use it. But it is nice to have it in your amateur photographer bag of tricks!
Let’s connect on social media too:
Mumbling Mommy on Facebook
Mumbling Mommy on Twitter
Mumbling Mommy on Pinterest
Tags: Cara


